This guide is only relevant for domains registered by or transferred to Shopify. If Shopify does not host your DNS records, you must add the necessary records with your DNS provider.
Introduction
Before you can start creating mailboxes with Mango Mail, you’ll need to set up the proper Domain Name System (DNS) records. This article will focus on configuring your domain through the Shopify store admin.
Prerequisites
- Create and set up your Mango Mail account.
- Own a domain.
- Use Shopify as your domain registrar.
- Add your domain through the Mango Dashboard.
Step 1. Go to your Shopify store dashboard and click on "Settings" in the bottom, left-hand corner.

Step 2. Switch to the "Domains" tab.

Step 3. Click on your root domain.

Step 4. Open the "Domain settings" dropdown and click "Edit DNS settings".

Step 5. Use the "Add custom record" dropdown to add DNS records.

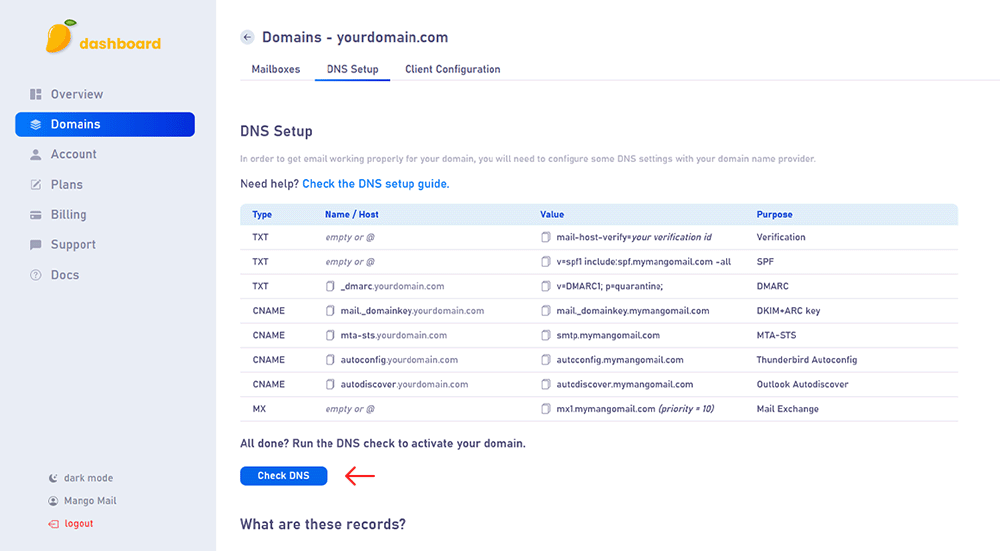
Step 6. Create the records shown on the DNS Setup page of your Mango Mail dashboard.

If your domain was recently registered or transferred, you may receive an error saying, "Dns record changes restricted for this domain. Contact support for assistance." In this case, you will need to contact Shopify support to add the record for you.
Step 5. Finally, return to the Mango Dashboard and click "Check DNS".
Next Steps
Now that you've finished configuring your domain's DNS, you can start creating mailboxes from the Mango Dashboard.